Most of the articles one can find about rebreathers deal with potential problems and limits of these wonderful pieces of kit. They give extensive information about oxygen sensors, scrubber duration, electronics and any of the risks associated with this kind of equipment. Becoming proficient with the emergency procedures is a very important component of training and experience. But an aspect that is sometimes a little bit overlooked is how to properly dive with a rebreather.
Contributed by
Unfortunately even some experienced rebreather divers are not comfortable and efficient with their rig. Their equipment is a mess and you hardly see their face underneath 200 hoses, straps and D-rings.
They swim as gracefully as a grasshopper with a portable fridge strapped on its back and a vacuum cleaner around its head. When asked the reason why they struggle for most of time they spent underwater, most of them finally agree that their trim sucks!
Rebreather divers are most of the time so focused on how to adapt and to improve their units and how to safely deal with all these modifications that they forget the most important skills any diver with any kind of equipment should master. Words like simplicity and ease have disappeared from their vocabulary.
Being Streamlined With a Rebreather
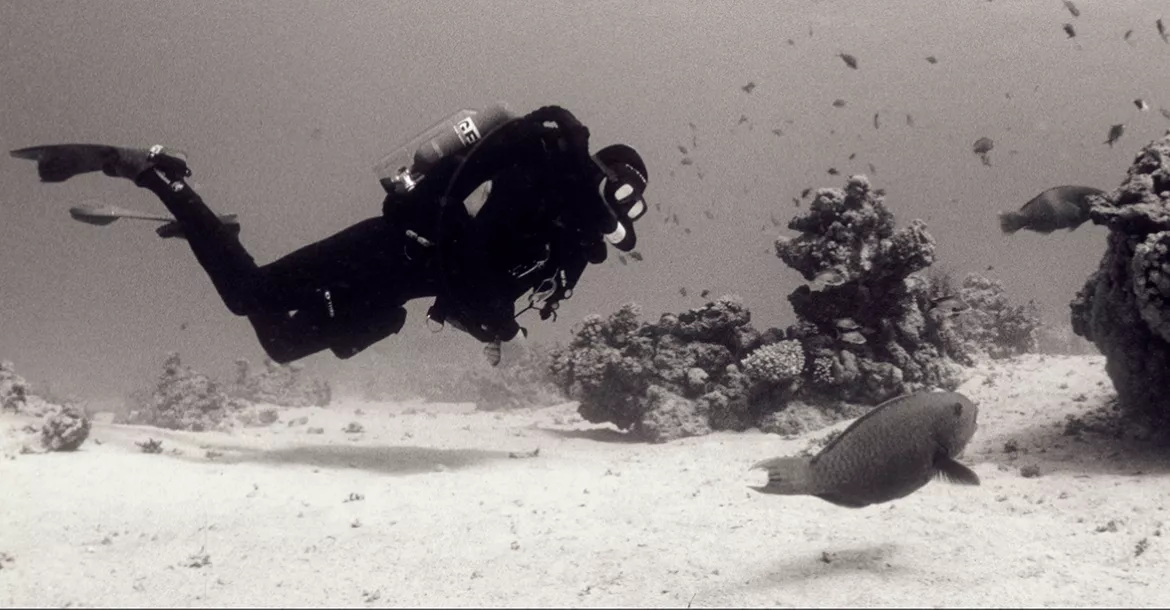
Very often, one can see a lot of rebreather divers who don’t move in a very efficient way. They swim in a strange position, closer to the seahorse than to the manta ray. They spend a lot of energy fighting against the increased density of water, adding drag and turbulence to the necessary energy one has to spend for their propulsion.
In one of his articles, Jarrod Jablonski states: “Resistance increases as the square of velocity. The energy required to overcome this resistance increases approximately as the cube of the initial energy required. What this means is that if one doubles the surface area of something, this results in a resistance that is four times the original resistance; in turn, this requires an increase in energy nearly sixteen times as great to offset the increase in resistance.”
It simply means that a rebreather diver (and all divers in general) should work to reduce their surface area. An article published in DIVE Magazine a few years ago shown that lots of drag were simply created by hoses and danglies not as close as they should be to the diver’s body. The gas consumption of a CCR diver is directly proportional to their level of exertion. Using more O2 to move underwater means having a shorter dive time and a higher CO2 production. Both factors are counterproductive for a rebreather diver who wants to get all the benefits of using such a complex piece of equipment.
Configuration and danglies
Most of the time, rebreathers look very bulky and messy. The technical rebreather diver has lots of hose and cable on their chest and their arms. Additional sling tanks and poor configuration don’t help to avoid the now popular astronaut-like image of the rebreather diver. It’s maybe satisfying to show that we can manage to dive with heavy and obviously very complicated equipment, but it’s definitely not streamlined and efficient.
Handsets: most of the CCRs have one or two handsets that are attached to the diver’s forearm. A highly inelegant cable is connected to the electronics, most of the time on top of the canister or the housing on the back of the rebreather. Each rebreather diver should have someone else taking pictures or video of their configuration to see how poorly streamlined these handsets are.
A better routing and maybe a chock cord loop at the appropriate location should help to keep the cables close to the body in any position (not only in a vertical position in front of a mirror!). SPG and LP hoses: in a similar way, a rebreather is full of hoses pointing downward or bulging out when the diver swims horizontally.
Shortening the hoses is of prime importance if you want to have a better configuration. And of course, unnecessary hoses and components are like pimples on a fashion-model’s face: they should be immediately removed! Counterlung placement: OTS (Over-The-Shoulder) counter-lungs often look very cumbersome compared to the back-mounted counterlungs where the chest area is clear.
Nevertheless, even OTS CLs rebreathers can be configured properly to diminish the cumbersomeness somehow. CLs can be adjusted very close to the body, almost under the armpits, without compromising the Work of Breathing and the diver’s comfort. Quite the opposite; when the diver has nothing on their chest, they can move more easily, closer to the obstacles or the bottom, with less drag and effort.
Balance and trim
Being able to achieve a horizontal position at all time (slightly head down, feet up) is not one the cave/wreck diver’s dream. It should be the main goal for everyone, but it’s definitely not the case for a vast majority of the rebreather divers. A balanced rig would avoid the so common “butt-heavy” position.
The ideal horizontal position mainly helps when you don’t want to silt up a place. Many divers think they are horizontal underwater; it’s, most of the time, not true. They are maybe horizontal when they swim but slowly (or quickly!) come back to a more vertical position as soon as they stop swimming.
With a balanced rig you can stop close to the bottom and stay horizontal even while doing a specific and difficult task (tying some knots on a guideline, adjusting some settings on a camera/dive computer, helping another diver, etc). A balanced rebreather is sometimes quite difficult to achieve because most of the units have the heavy components on the bottom (valves, regs, etc) and the buoyant components on the top (counterlungs, wings, etc).
The first step is to work on the rebreather configuration:
Cylinder and regs: Some rebreathers have the option to de-invert the tanks in order to shift some weight on top of the unit.
Trim weight: The rebreathers with a case don’t have a lot of flexibility for their configuration. A trim weight can then be added on top of the unit to offset the unbalance.
Wing and backplate: A short wing with more lift on the bottom than on the top is clearly a useful tool for a better trim. Counterlungs: the position of the CLs is obviously important but their size is also another factor to consider. A smaller volume and less gas (optimal loop volume) help to reduce the uplift component of the vertical vector. Then the second step is to see how the rest of the dive gear will interact with the rebreather.
Dry or wet suit: a dry suit generally gives a better trim as it provides the diver with some additional buoyancy on the legs. It’s most of the time not the case with a wetsuit (specially at depth with the suit compression). Other equipments like pockets or heavy fins (ie JetFins) have also to be considered.
Additional equipment: Most of the time, a rebreather diver will carry other pieces of gear like sling tanks and canister lights. The buoyancy characteristics of the tanks (full or empty) and the lights have to be thoroughly checked as they can easily ruin a good trim so difficult to achieve! Ask a friend who has a camera to spend some time with you underwater.
Then, back to land, have some fun discovering what you actually look like. Spot all the danglies. Check what could be more streamlined. Go back diving and repeat the process till you become frozen. To speed up this process, a friend of mine even uses a big mirror in his pool. You directly see what could be adjusted and immediately try! Like a dancer in a ballroom.
Mastering Buoyancy Control with a Rebreather
So, let’s assume that the trim is now a problem of the past. The next step is Buoyancy. Buoyancy control is an essential element of diving proficiency; it is also one of the hardest skills to master, especially with a rebreather. You have to control the gas in the wing, the dry suit, the breathing loop.
You have to take into account the suit compression at depth, the buoyancy characteristics of the tanks when empty at the end of the dive, the effect of oxygen automatic injection when you’re in the shallows, the gas you loose from the loop when you clear your mask or equalize your ears. So many elements! Few diving skills are so essential, and yet so underemphasized by the rebreather diving community.
Buoyancy control can be divided in three different phases:
Buoyancy control at constant depth:
O2 injection. It might be done manually or with the help of a solenoid valve or a KISS valve. In all cases, oxygen level is kept pretty much constant in the breathing loop and that directly affects your buoyancy.
Optimal Loop Volume. A rebreather diver should have enough gas to comfortably breathe from their loop. If more than a deep breath is possible, it means that there’s too much gas in the breathing loop. And too much gas means more O2 injection to maintain a constant pO2, more gas expansion/compression when the depth changes, more buoyancy on the upper part of the body. So many things we should avoid at all cost.
Dry suit inflation. When the pO2 is spot on and the diver has enough gas to fill their lungs, comfort is another important factor. That’s where the dry suit comes into the equation. Some divers need a dry suit because of the water temperature or because of the duration of their rebreather dive, while others simply like the dry suit for its ability to give a better trim. Dry suit inflation is most of the time just enough to avoid suit squeeze at depth, without compromising the diver’s buoyancy control, but some divers prefer to use their dry suit as their main buoyancy tool (to a certain extent). It’s obviously a matter of practise, experience and personal preference.
Wing/BCD inflation. The wing can certainly be used to control one’s buoyancy (it was designed for that!) but only when all the previous elements have been fulfilled. The more tools are used for buoyancy control, the more tools have to be managed during the ascent. Most of the time, when you realized you start to ascent too fast, it’s already too late! Practicing some skills should help you to fine tune your buoyancy. For all of them, do not use your hands to keep your balance or to maintain your depth.
Relax and try to make as few movements as possible.
- Float for a few minutes in a slightly head down position while remaining within 30cm off the bottom or of the starting depth if you’re practising in midwater (use a point of reference like a shot-line)
- Switch from CCR to open circuit back and forth without changing depth
- Manually fly your rebreather without changing depth
- Remain horizontal and stationary, hovering over a fixed point while focusing on another task (like scrolling down the menu of your computer or your handset)
Buoyancy control during descent:
Controlling the buoyancy at a constant depth and during the descent are very similar, as long as the descent rate is slow. You have to find the right balance between:
Positive buoyancy
Manual/ADV Diluent injection
O2 injection (KISS valve/solenoid/manual injection)
Wing inflation
Dry suit Inflation
Negative buoyancy:
Lead weights
Gas compression
Suit compression
Gas lost during air space equalization and mask clearing
The idea is to go down slowly in order to control all these components.
A few other skills might help you to achieve this goal.
- Perform a descent in a horizontal position. Many divers have a problem to control their descent rate in this position, as they cannot use their fins to slow down.
- In a horizontal position, slowly descend and stop within 50cm from the bottom or from any predetermined depth. ADV/manual injection can be used, along with dry suit and wing inflation.
Buoyancy control during ascent:
When it comes to buoyancy control during the ascent, rebreather divers have often more problems than their OC colleagues. So many air spaces expand during the ascent that a lot of rebreather accidents are caused by uncontrolled ascent. Starting the ascent with only a small amount of gas in the loop/dry suit/wing definitely helps this kind of ballistic event. Here are some other skills:
Perform an ascent in a horizontal position. The proper positioning of the rebreather OPV (Over-Pressure Valve) is quite important. The alternative is to exhale off the loop to keep the loop volume constant, despite the O2 injection (manual or automatic) during the ascent.
In this position, venting the wing should be done with the dump valve on the bottom of the wing, instead of the corrugated hose that requires the diver to be more vertical.
Some skills that might be helpful to practise:
- Slow ascent with manual O2 injection only.
- Same ascent but eyes closed (shallow depth).
- Slow ascent and simulated stops on Semi-Closed Rebreather mode.
- Slow ascent on Open Circuit (buoyancy control of an expending breathing loop).
- Slow ascent with all the bail-out tanks nearly empty. Simulated stops with tank exchange with a team mate could also be a useful skill to practice.
- Slow ascent and stop at any pre-determined depth, using only manual O2 injection to maintain your pO2.
Don’t cheat If your rebreather has an ADV, don’t shut it off and don’t turn the diluent tank valve off. You have to learn how much gas you have to vent without completely emptying the loop.
Mastering Propulsion Techniques
Now you’re not only horizontal underwater, perfectly balanced at all time, but you’re also motionless exactly at the depth you want to stay. Just add various efficient kicking techniques, and you’ll be able to move in any direction with the least amount of energy (a.k.a. oxygen consumption). You’ll be comfortable and efficient (less stress and drag). There are a variety of propulsion techniques available to divers. The experienced diver alternates between different types of kicks to reduce muscle cramping and to meet the demands of various diving environments.
Alternate kicks
First, by alternating between kicking styles they allow themselves to rest certain muscles by using others. Second, by varying a kicking style, an experienced diver can adjust their propulsion technique to the demands of a particular environment; by switching from a frog kick to a modified flutter, the diver can minimize silting in a low and silty area where the full movement of a frog kick is restricted by some walls or rocks.
Those of you who regularly dive in silty or overhead environments might be concerned about reductions in visibility. A loss of visibility can substantially impact both individual and team safety. To avoid the likelihood of reduced visibility, trim has the utmost impact. With a proper, feet-up swimming profile and reasonable buoyancy control a good diver can safely travel in wrecks and cave passages that are particularly susceptible to diver movement.
As exhaust bubbles and percolation are normally not a concern with rebreather divers, the main culprits of reduced visibility are errant fin kicks, erratic hand movements and poor trim.
Modified Flutter kick
Instead of the strong flutter kick used by recreational divers (great deal of power but also significant downward turbulence), the modified flutter kick is based on bent knees and kicks from the knee, directing the water upward. In extremely silted areas, the modified flutter kick can also be done only with their ankles.
Frog Kick
Commonly used by cave and technical divers, the frog kick eliminates the vertical component of a flutter kick. As the modified flutter kick is not really powerful, it cannot be used in high flow conditions or for very long periods of time. Therefore, as the frog kick directs the water up and back rather than down, some divers use it most of the time.
Some skills to fine-tune your propulsion techniques:
- Alternate between frog kick and modified flutter kick.
- Swim within 50cm from the bottom in a silty area.
- While hovering horizontally, turn your body 360 degrees in each direction using only your legs (no hand movement).
- While floating horizontally, back up slowly while using only your legs (no hand movement).
So, it’s all about comfort!
When rebreather divers discuss with open circuit divers, they always talk about the benefits of diving their favourite unit. Some speak about silence, lack of bubbles, low gas consumption, warmth of the inhaled gas, etc. However, one of the main benefits of open circuit SCUBA is obviously its simplicity, especially when it comes to buoyancy control and trim. Compared to a rebreather diver, an experienced OC diver will more easily be comfortable with their rig.
Why?
Because most of the rebreather divers don’t really work on their comfort, their trim, their balance, their streamliness, their propulsion or their buoyancy. It takes more time and it’s often more difficult to achieve than in OC. But it’s like many things in diving. It’s worth the extra work. I don’t know any rebreather who never had the feeling that their unit was cumbersome and that their trim didn’t need to be improved.
Being comfortable is a way to better enjoy the dive, but it’s also a critical component of safety! By practicing all the skills (and more) described in this article, one should achieve the Trinity of the comfortable rebreather diver: Trim, Buoyancy and Propulsion (or TBP). These three essential elements are more difficult to master with a rebreather than with a conventional scuba unit.
But it’s just a matter of practise. Practising emergency skills can save your life. Practicing your TBP will only save your dive. Many people think they are efficient and look great underwater. A short video session quickly changes their opinion and their self-esteem.
Rebreather diving is all about time spent underwater… ■